March 10, 2019: Big thanks to sistemadigitale for pointing to long time
bug with category setting of new cover upload, and patience with fixing it
on my side! (Marek)
January, 10 2015: Note: After server software upgrade, I had to rewrite some parts of website code Thus parts of the site could be still buggy, Kindly, report to me.
Sept 15, 2014: Thanks Onur Demirsoy, for nice favicon ;)
May 4, 2013: I apologize for downtime, disk got full, had to redone server a bit. Please email me, if there would any problems appear, thanks.
|
DivX Tech news DivX software Subtitles Subtitler Groups DVD/VCD covers Skins Guides Dr. DivX;-) Movie-Ex 
|
Guides
| Transferring from DivX to VCD, as well as with AC3 sound |
| Programs: Virtual Dub + Subtitler plugin Nandub TMPGEnc HeadAC3He Burning program with VCD feature, WinOnCD 5, Nero... codecs. | |
| step 1: Titles First you have to get yourself into DivX film titles. This is nothing hard, but time consuming. The titles must first be converted into SSA format (with the aid of SubEditor for instance) which every good editor of tiltles should be able to manage. I recommend setting the size of letters to 20-22. I do this with the help of a SubEditor, but there also exists the utility srt2ssa. Then you have to open the film and set it in Virtual Dub: Audio-Direct Stream copy, Video-Full processing mode. Compression - choose an arbitrary divx kodek and bitrate, put even 1000. (If you have the time and you want it to look even better, you may convert it by 2 pass). Now you want to add the titles. Video - Filters - Subtitler. This subtitler shows titles in the format ssa in film. Setting is simple:list the titles and I suggest marking the selection {/q2} as far as seperating the lines of the titles are concerned. In Preview you can check how the final result will look. If you put File-Save avi now, the film will be converted into DivX again, but the titles will be in the screen. Do not be scared if the resulting file is big, even 1GB. You erase this later. | |
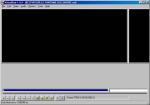
Seperating the film into more parts The resulting film must be broken into parts no longer than 70 minutes. I chopped some 60 minute pieces, and the resulting mpg file came to about 630 MB. So, the recordeed film with its titles you open up in Nandub. Set the Video and Audio on Direct stream copy. Set it at the start of the file, and from menu Edit you select Set Selection Start. Then do Edit-Go and set for 60 (max.70) minutes, verify it. The film should be shifted to you in about an hour. Now, down in the panels, click on the key icon (look at the bottom of the screen). This will record the film in its key shots. You have to choose where the best places to break up the film are (the middle of a car chase is not a good spot as you know), and from the menu Edit you pick Set Selection End. Down in the indication bar there should be a glowing blue light with part of the film from the beginning to the current position. If it is there, hit File - Save and record the first part. when it`s over, without any shifting in the picture, you simply do Edit - set selection start. Then move to the end of the film and hit Set selection End. This should glow from the mid-point to the end. Save as, and you have got the second half of the film. If the film is longer by chance, and you have to cut it into more pieces, the approach is the same. Of course you can cut in the arbitrary program, but then you have to check if the sound was cut well too. It happened to me once, that the first half of the film had sound and the second half didn`t. | |
| step 3: Transferring AC3 sound If there occurs a problem with a DivX film with AC3 sound, it ishow to transfer the sound into something which TMPGEnc will recognize. It took some work, but I figured it out. The broken film is opened up in NanDub (each part of the film), and you choose from the menu File - Save Wav. In a moment, you have on the disc exported sound from the film. Of course the sound is compressed by kodek AC3, so change the index to .ac3 (this is important). Then put on HeadAC3He, where this ac3 file is opened, and get it converted on wa. (I recommend wav, it is faster and TMPGEnc deals with it better than MP3). In options set it to Stereo (at the very bottom), and in the main window cancel in the window 2pass. That is basically everything, you you don`t have to set anything else. Put on the conversion and wait for a minute. It is quite fast, the fastest convertor of AC3 files. The nazov.wav file will come up. It should have around 650 MB, so be sure of space on the disc. And now you will once again attach sound to the film. Open up the titled film (or its pertainent part) in NanDub, set Video and Audio on Direct Stream Copy. From the menu Audio, choose Wav Audio. list the converted file and do Fil - save Avi. You will get another file with a size around 1 GB. But this one you can use to transfer into mpg. All previous copies can be erased, just be careful you don`t erase another part of the film. Note: This approach may be used for other sound kodeks. I figure TMPGEnc cannot manage the variable bitrate MP3. Yes, and for conversion it is really much better to use HeadAC3He. I tried other programs, and they messed things up. This one, apart from doing things right, was the fastest. | |
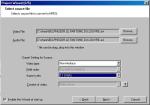
Converting to mpg Now you come to the main part. For this you need the program TMPGEnc. There is really no difference which version, now it is something like 2.54, but not free (supposedly you can get around this by putting it on with a set date in the future. Then just set the normal date, and everything is OK). At home I`ve got an old beta 0.xx neco, and it works fine. So put on TMPGEnc. Then you will get Wizard. Choose from the menu in the first frame VideoCD format PAL. This is very important. I got the images from version 2.54, but you can get yourself oriented just the same in any other version. It is all about setting the video and audio flow. Through Browse you can download the video file (DivX with titles, which we put together from the previous points, like the 1st part for instance). If the TMPGEnc recognizes the format of sound compression, then it will automatically download the Audio File. If not, you`ve got some problems. This may be avoided for example when converting films while you are adding the titles. At the same time you would be converting the sound. TMPGEnc format MP3 supports this. As I know, it does not recognize WMA and nor do I think DivX Audio. Otherwise, you set everything as it is here on the screen. | |
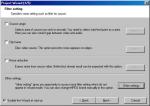
Filter settings Here you click on Other Settings. You can also set in a few minor things. | |
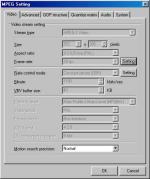
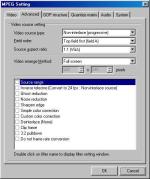
MPEG settings This was all set by TMPGEnc alone, and you don`t really have much of a chance to change that. What is key is that you have Size:352 X 288 and Frame rate: 25fps. This is a specification of Pal Video CD. If it is not there, then you must get it there. Otherwise, the resulting VideoCD will not function properly. (It should set things properly itself). You may also change the item Motion search precision to Highest quality (very slow) if you want a super picture. So far I`ve been using Normal and it is quite OK. But that is no reason to not get better, right? | |
MPEG settings 2 Here it is important to have Video arrange Method set at Full screen, otherwise your picture will get deformed somehow or another. This adjusts itself automatically, but check it. | |
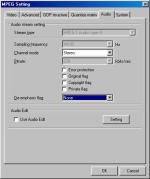
MPEG settings 3 The audio should be MPEG-1 Audio Layer II. This is automatically set. It would also be good to get Bitrate 192kbits/sec, but I didn`t find it in this version. | |
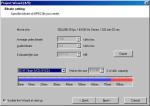
Bitrate settings Now we are already past OK and Next. Here you basically just change the size of the CD. I recommend a 74 minute CD. The resulting mpg file is burned as VideoCD, and some other files get added. This is so you have space on the CD. | |
Output file name This screen does not require commentary. Maybe just that you don`t have to convert it at once, so do not hit Start encoding immediately. | |
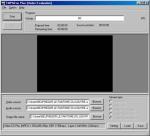
Start Here you check all the settings. It is important that the Stream Type is set on System (Audio-Video). If everything looks good, hit Start and wait. | |
| step 12: Burning The resulting mpg files you burn on a CD in a random program, which is done in format VCD. I work with WinOnCD5. This should handle everything allright, there is no conversion or other catch, except perhaps that it is recommened to select VCD v.2 and not SVCD. | |
| [BACK] |
| Comments |
| |||||||
